This tutorial covers part one of a multi-part series where we’ll go through the process of building a stylish design portfolio website. In this particular article we’ll create the visual concept and overall design concept in Photoshop, using various effects, blending modes and layer styles to create all the detailed elements of the design.
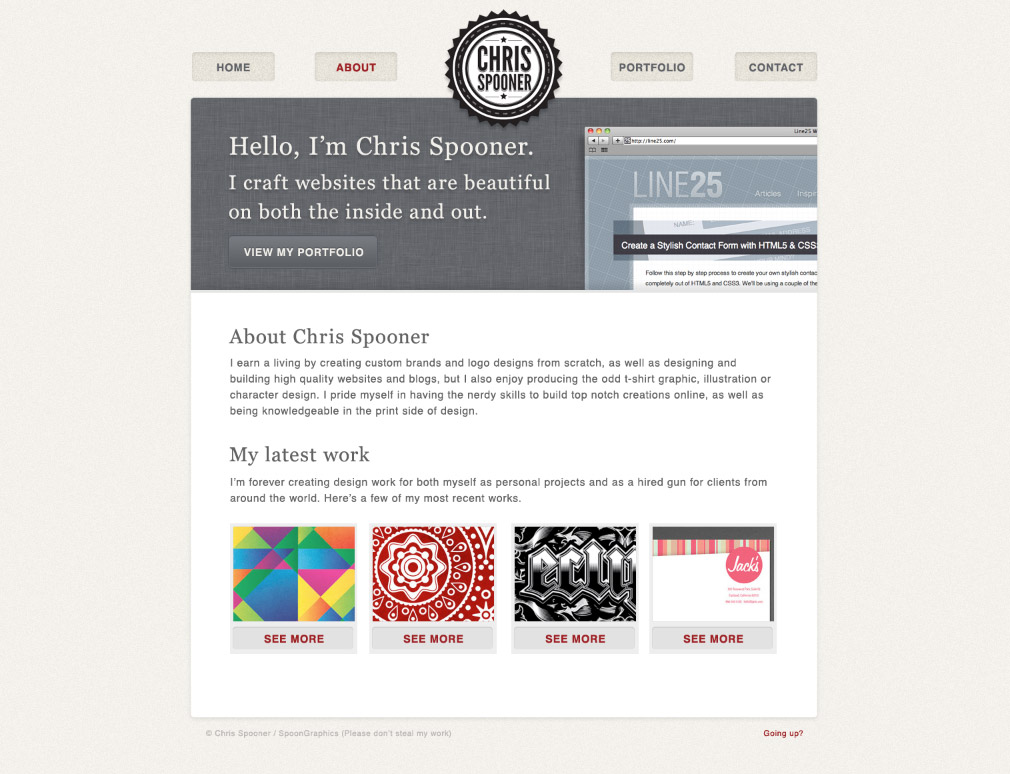
The website we’ll be creating features a nice and clean layout and makes use of a contrasting header area to draw in the user. Otherwise the concept is styled with large typography and subtle details on the interface elements. Once you’ve finished your PSD concept, head over to my web design blog at Line25 to learn how to code up the design, then transform it into a fully working WordPress theme.

Open up Photoshop and create a new document. I tend to work with dimension of 1680×1050 to gain an idea of how the website will look on a widescreen monitor. Fill the background with a light grey/cream and give 2% worth of noise from the filter menu.

Right click and transform a selection to 960px, then draw guides to highlight the centre and each side.

Use the rounded rectangle tool to draw a content area, but leave the edges around 10px short of the guides to allow for a Drop Shadow effect to be added.

Paste in your logo in the centre of the design. If you fancy creating yourself a cool little emblem style logo like this, check out my old tutorial.

Use the rounded rectangle tool to draw a small button in the header area. Change the blending mode to Overlay to allow the underlying texture to show through.

Add a very subtle Inner Shadow to give the impression of an inset appearance. The key is to turn the opacity right down to around 10%.

Make copies of the button to either side of the logo, then add text to each navigation item. Typical pages might be home, about, portfolio and contact.

CMD+click the thumbnail of the of the white content area, then ALT-drag across the lower portion with the marquee tool to leave a shorter selection. Fill this area with black.

Load the layer styles window for this layer and add a Pattern Overlay. Here I’m using an iPhone 4 style fabric texture from Dr.Palaniraja.

Draw a thin 4px border across the bottom of the header area and give it a light grey fill.

Use a black to transparent gradient to draw a small shadow along the bottom edge of the header. Tone down the opacity to around 10%.

Use the Georgia font to add a stylish introductory title to the header area. Add a touch of tracking to space out the letters slightly.

Draw a button shape using the rounded rectangle tool, then use the layer styles window to begin sprucing it up. Begin with a gradient using a dark and light grey sample from the header background.

Give the button a beveled appearance by manipulating an Inner Glow into a thin light grey border, then add a 1px dark grey Stroke.

Finish off the button with a line of text and adjust the settings of the Drop Shadow effect to create an inset appearance.

Paste in a sample of your website design work in the header. Make a selection from the header area then add a layer mask to trim the screenshot to size.

Add a Drop Shadow using Photoshop’s layer style effect then right click and select Create Layer. Use the Warp function of the transform feature to bend the shadow outwards. Lower the opacity to give a more realistic appearance.

Use the typography from the header titles on headings in the main content area and write out the main body copy with a nice large sans-serif font.

Draw a grey rectangle as the base of a portfolio item preview, then give a rounded rectangle an Inner Shadow to create a subtle button element.

Finish off the portfolio item with a thumbnail with the project being showcased, then add a text link using the font styling from the navigation menu.

Group and duplicate the elements that make up the portfolio item then swap out the thumbnails to showcase your latest work.

Finish off the footer area with a copyright notice and back to top link. The main home page concept is now complete, so let’s flesh out the inner pages.

Duplicate your PSD and rename it to ‘About’. The inner pages don’t need a large header area, but we can use the space to display the page title. Trim the header area down in size.

Adjust the text in the header to introduce the page. In this case the About page can be titled ‘About Chris Spooner’ – Or it might be a good idea to use your own name.

Paste in your body copy to fill out the about content area. Don’t forget to leave space to display a picture of yourself!

The Portfolio page can be constructed by duplicating the portfolio items and replacing the thumbnail for each of your design projects.

Fill out the page with a selection of portfolio items. When we eventually build the website as a WordPress theme, each portfolio item will be created as a blog post.

Use a range of rounded rectangles to lay out a typical contact form for the contact page, then list out your favourite social website along with icons.
Don’t forget to stop by over at Line25 to learn how to take your PSD concept and turn it into a fully working HTML and CSS website.